Telemetry Insights

Using the Telemetry Insights App

Complete App User Guide

beginner20 minutes

This guide covers everything you need to know about the Telemetry Insights app, from signing in for the first time to managing your subscription, configuring notifications, and integrating with Home Assistant.

Screenshots for each section are also available in the Customer Manual on our website.

Getting Started

The Telemetry Insights app runs as a Progressive Web App (PWA), no App Store download required. Open app.telemetryinsights.com in your browser, sign in, and you're monitoring immediately.

For the best experience, full-screen mode, home screen icon, and push notifications, install the app to your device. See Installing the App → for step-by-step instructions for iPhone, Android, Windows, and Mac.

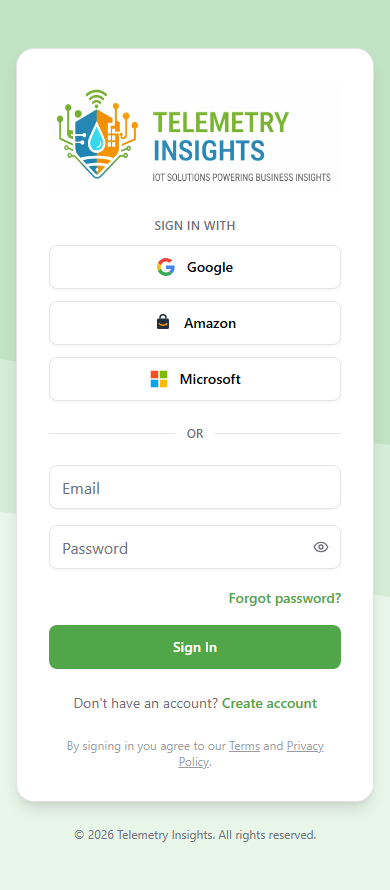
To sign in:

  1. Go to app.telemetryinsights.com
  2. Enter your email address and password, then tap Sign In
  3. Alternatively, sign in with Google, Amazon, or Microsoft if you used one of those when creating your account
Sign in screen on mobile
View full size
Sign in screen on mobile

Enable Push Notifications Immediately After Installing

Push notifications are how you find out the moment something is wrong, a soil moisture alarm, a device going offline, or a freeze warning. Without them, alerts only appear when you open the app.

  1. Open the app from your home screen icon (not from the browser tab, it must be the installed icon).
  2. Go to Notifications → Settings.
  3. Tap Enable Push Notifications.
  4. When your device asks for permission, tap Allow.

On iPhone, the permission prompt only appears when the app is opened from the home screen icon, it will not appear in Safari. See Installing the App → for full per-platform instructions.


Dashboard

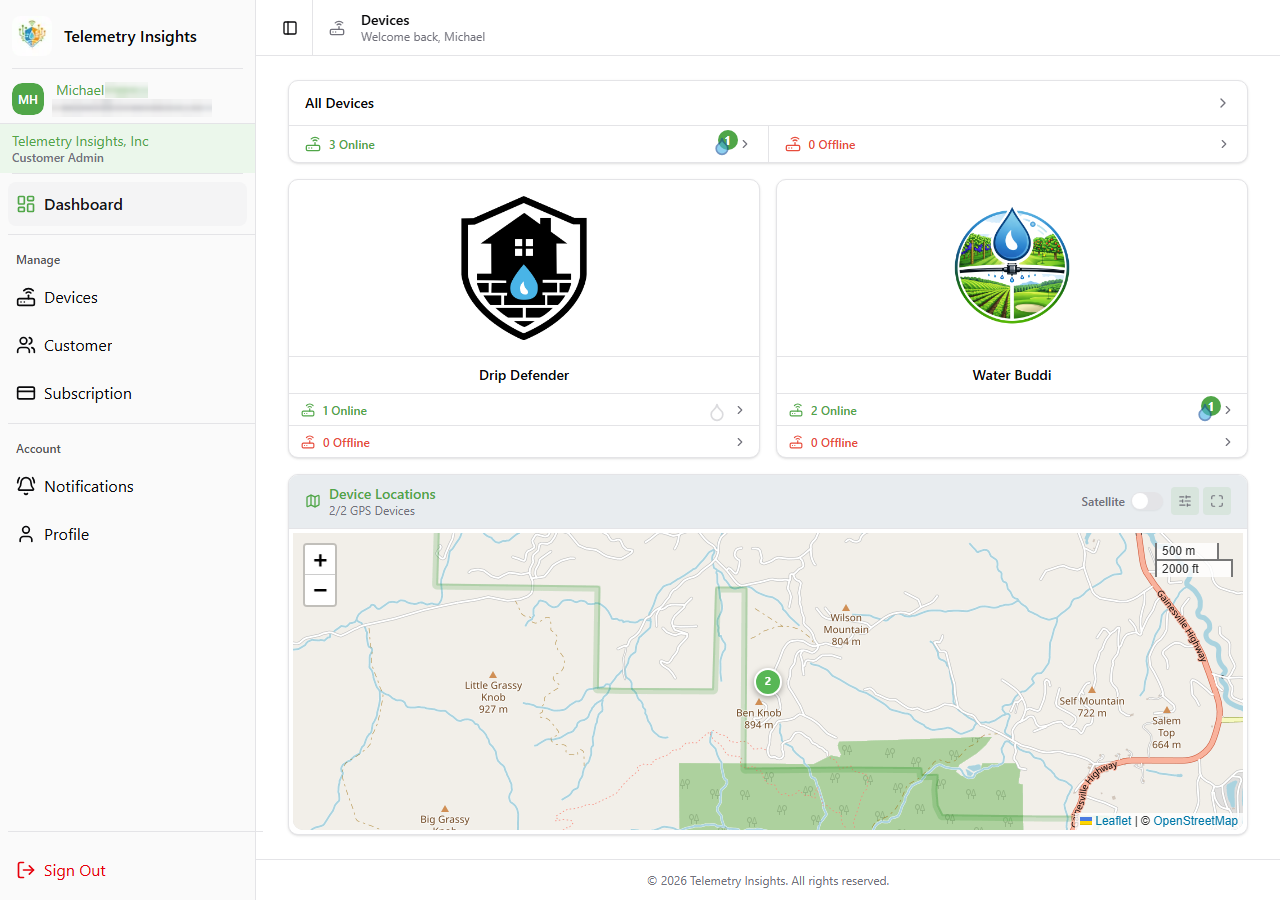
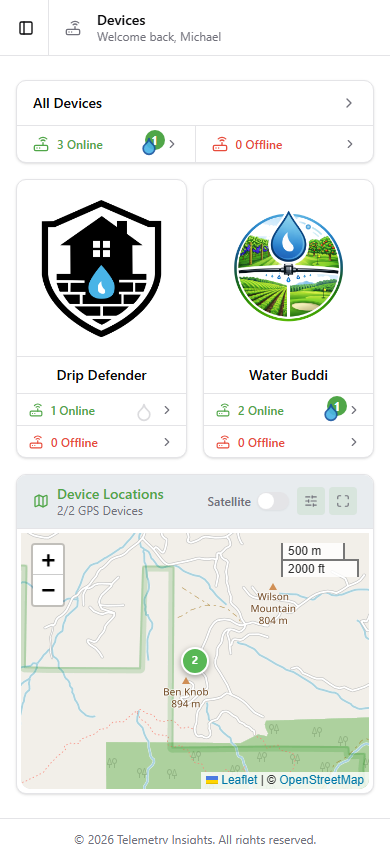
The dashboard is your home screen. It gives you an at-a-glance view of all your devices and their current status.

  • Device profile cards, one card per device type (Water Buddi, Drip Defender). Each card shows the total device count, how many are online, and how many are offline.
  • Tap a profile card to jump directly to the filtered device list for that type.
  • Map widget, shows all GPS-equipped devices on an interactive map. Tap a pin for a quick status summary, or tap the Expand button to open the full-screen map.
Dashboard on desktop
View full size
Dashboard on desktop
Dashboard on mobile
View full size
Dashboard on mobile

Your Devices

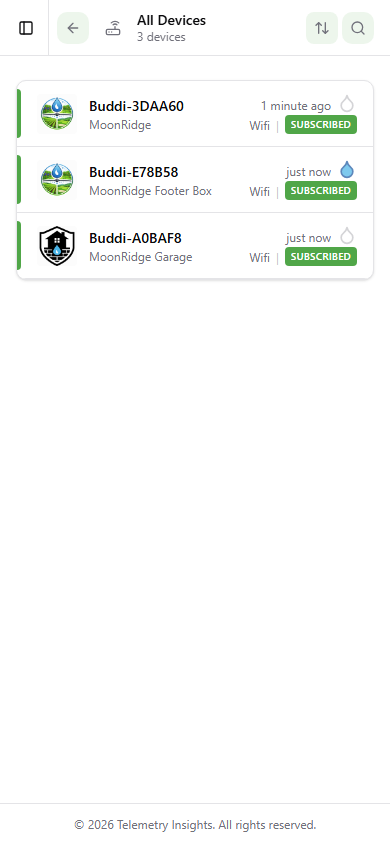
The Devices page lists every device assigned to your account.

  • Search, tap the search icon in the top bar and type a device name or label to filter instantly.
  • Sort, tap the sort icon to order by name, label, or last activity.
  • Status indicator, a green bar on the device card means the device is online; red means offline.
  • Subscription badge, shows whether monitoring is active for each device. Devices without an active subscription slot display a "No Subscription" status and cannot be monitored until activated.
  • Tap any device row to open its full detail page.
Device list on mobile
View full size
Device list on mobile

Device Detail

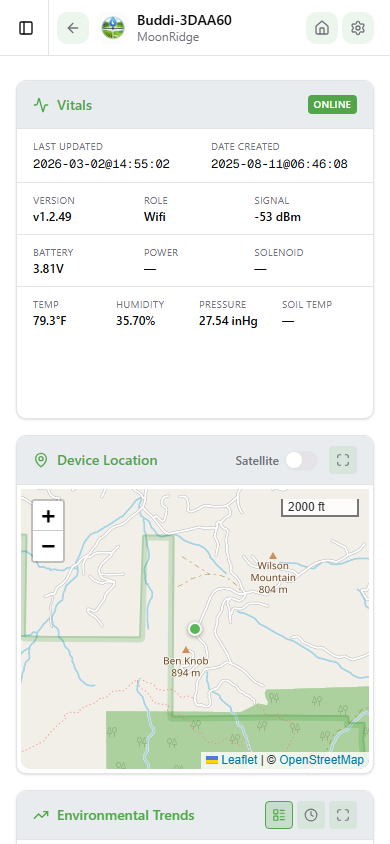
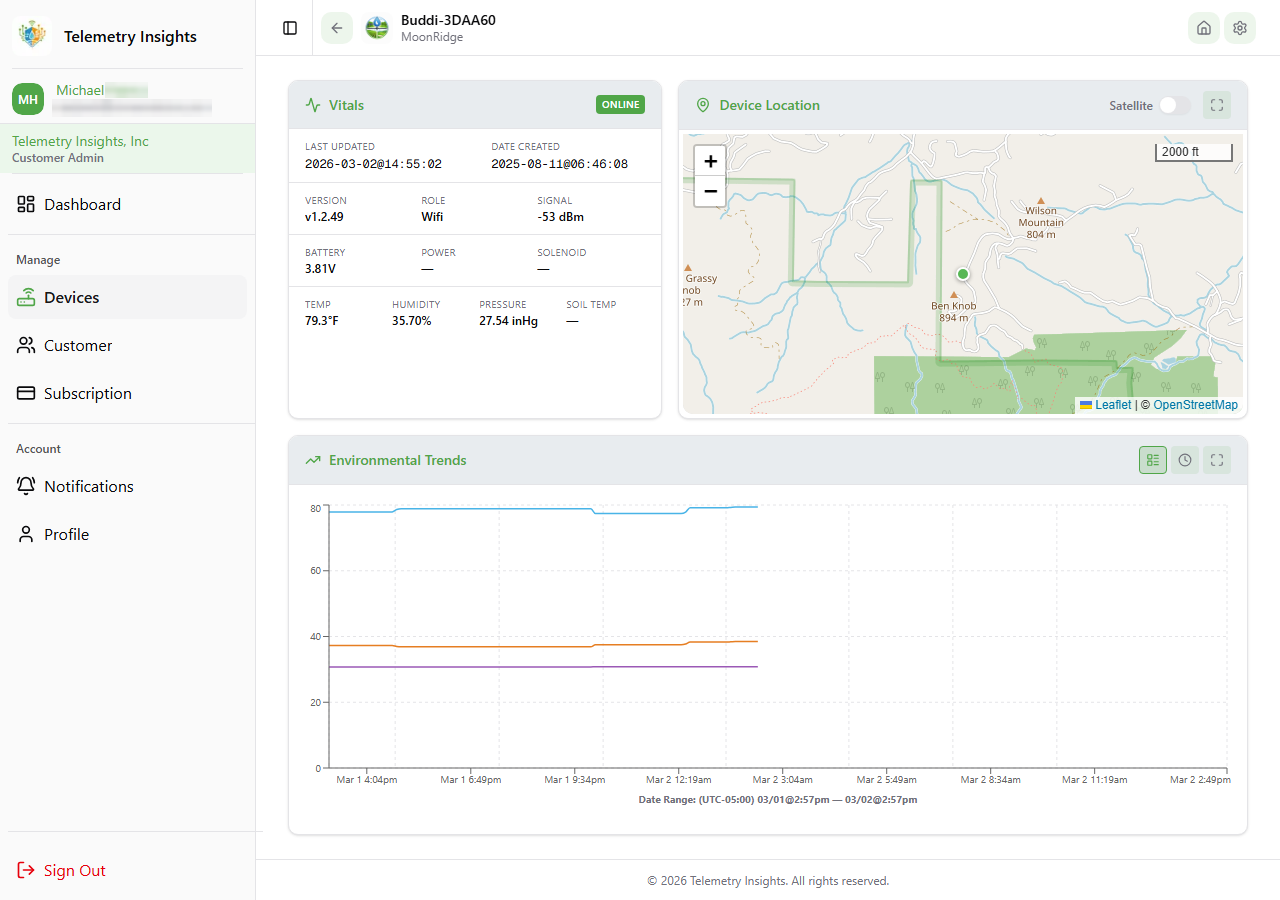
The device detail page shows everything happening with a single device in real time.

Vitals Widget

Live sensor readings that update automatically via WebSocket, no manual refresh needed:

ReadingDescription
BatteryCurrent battery level
TemperatureAir temperature at the device
HumidityRelative humidity at the device
Soil MoistureSoil moisture reading from the probe
PressureBarometric pressure

Location Map

Shows the device's GPS position on an interactive map. Tap the expand icon for a full-screen view.

Trends Chart

Historical telemetry for any time range you choose:

  • Use the series toggles to show or hide individual sensor readings (temperature, humidity, soil moisture, etc.)
  • Use the time-range buttons to zoom into hours, days, or weeks
  • Pinch or scroll to pan and zoom on mobile
Device detail on mobile
View full size
Device detail on mobile
Device detail on desktop
View full size
Device detail on desktop

Device Settings

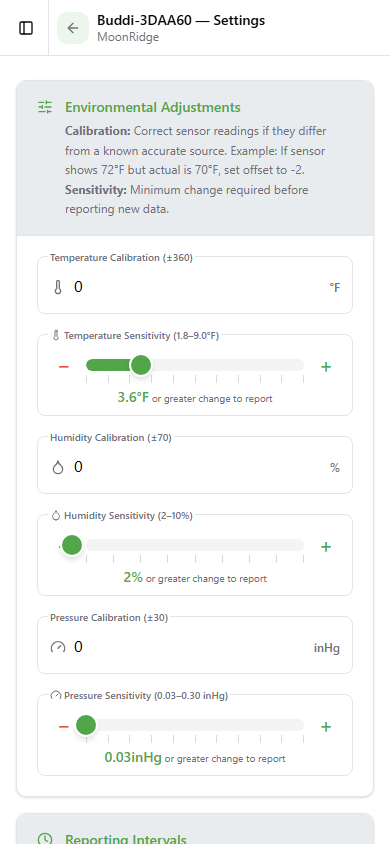
Device settings let you fine-tune how each device reads and reports data.

Calibration Offsets

Adjust readings to correct for sensor variance. You can offset:

  • Temperature, shift the displayed temperature up or down
  • Humidity, shift the displayed humidity reading
  • Pressure, shift the barometric pressure reading
  • Soil Moisture, shift the soil moisture reading

Reporting Intervals

  • Sensor interval, how frequently the device takes a sensor reading
  • Telemetry interval, how frequently the device transmits data to the TI cloud platform

Tap Save to apply changes. Settings are sent to the device on its next check-in.

Device settings on mobile
View full size
Device settings on mobile

Home Assistant Integration

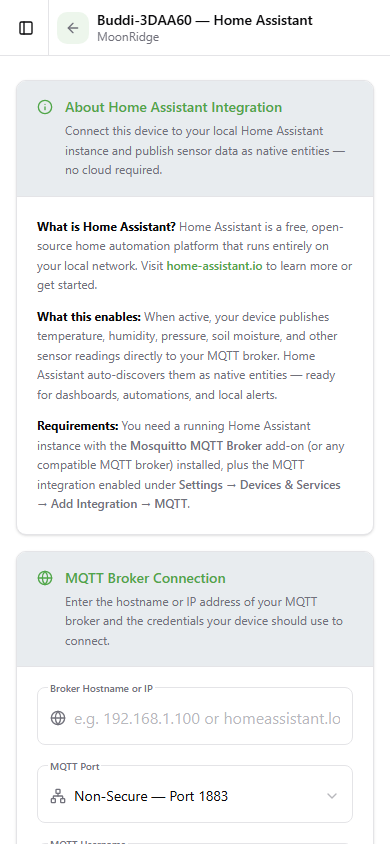
Each device can bridge its live telemetry to a Home Assistant instance over MQTT. This lets you use TI sensor data inside your home automation workflows, trigger rules based on soil moisture, temperature, or any other reading.

To configure:

  1. Navigate to the device, then tap Settings → Home Assistant
  2. Enable the Home Assistant Bridge toggle
  3. Enter your MQTT broker details: host, port, username, and password
  4. Tap Save

The device will start publishing telemetry to your MQTT broker on its next reporting cycle.

Note: This is an advanced feature. You need a running MQTT broker accessible from the internet (or on your local network if the device is on the same network). Home Assistant's built-in Mosquitto broker add-on works well.

Home Assistant MQTT settings on mobile
View full size
Home Assistant MQTT settings on mobile

Devices Map

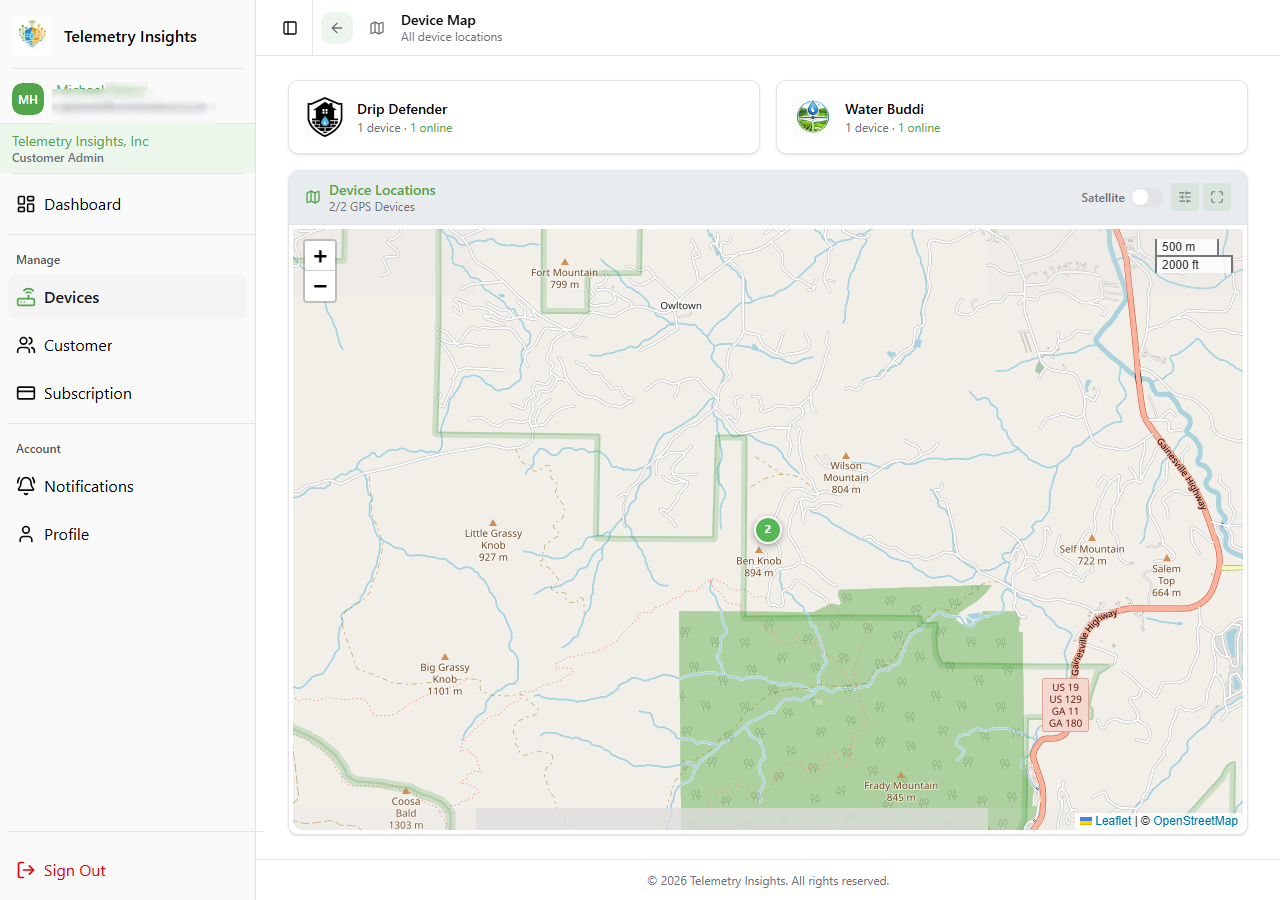
The full-screen map shows all your devices at once, useful for multi-property operators and large commercial deployments.

  • Filter panel, filter visible devices by device type (Water Buddi, Drip Defender) and online/offline status
  • Satellite view, toggle between standard street map and satellite imagery
  • Cluster pins, when multiple devices are close together they group into a numbered cluster. Tap the cluster to expand and see individual devices.
  • Single pin, tap to see a quick-view popup with live telemetry. Tap View Device Details to open the full detail page for that device.
Devices map on desktop
View full size
Devices map on desktop

Subscription

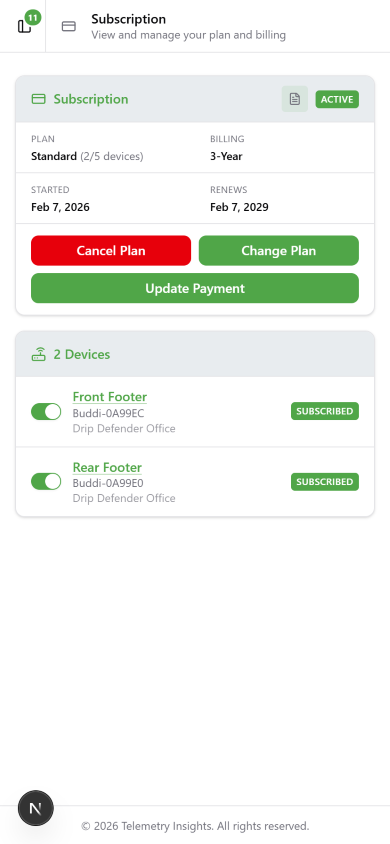
The Subscription page manages your cloud monitoring plan, what plan you're on, which devices are active, and your billing.

  • Plan card, shows your current tier, billing interval (monthly/yearly/3-year), subscription start date, renewal date, and how many device slots are in use
  • Change Plan, opens the plan selector where you can upgrade, downgrade, or switch billing intervals. You can also purchase a new subscription from here. Available from the web at telemetryinsights.com or directly in the app.
  • Devices, toggle which specific devices consume a subscription slot. A device must be toggled on here to have active monitoring. Tap Save to apply changes.
  • Billing, view past invoices and update your payment method
  • Cancel Subscription, cancels at the end of the current billing period. Your devices remain monitored until that date.

Adding a device to your account is free and happens during account setup. A subscription slot must be assigned to each device before monitoring, alerts, and live data are accessible for that device.

Subscription page on mobile
View full size
Subscription page on mobile

Notifications

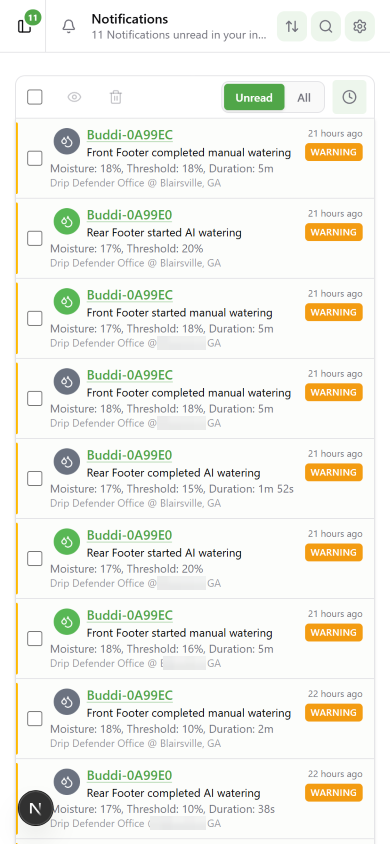
The Notifications page shows all recent alerts from your devices, alarm events, system messages, and status changes.

  • Unread notifications are highlighted. The unread count badge in the sidebar updates in real time.
  • Mark as read, swipe right on a notification or tap the eye icon
  • Delete, swipe left or tap the trash icon to remove a notification
  • Search, tap the search icon and type keywords to filter your notification history
  • Sort, reorder notifications by date or by severity level
  • Tap a notification to see the full alarm details including device name, reading values, and timestamp
Notifications page on mobile
View full size
Notifications page on mobile

Notification Settings

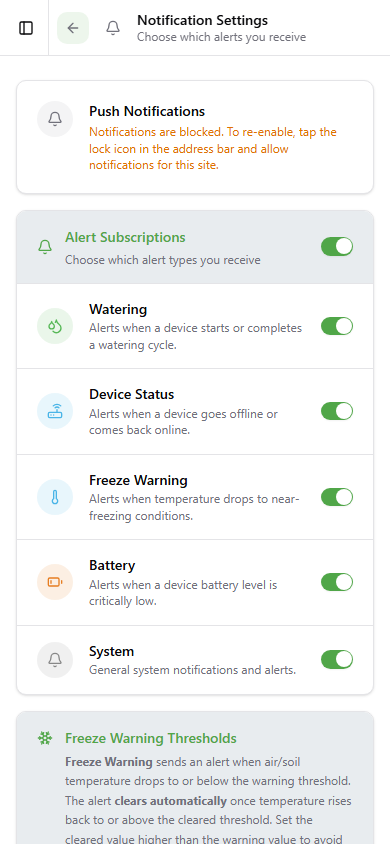
Notification Settings let you control which alarm types send push alerts and at what thresholds.

Alarm Types (toggle each on or off)

AlarmTriggers when...
Battery LowDevice battery drops below your threshold
Freeze WarningTemperature drops below your threshold
Device OfflineDevice stops reporting to the cloud
Watering AlertA watering event starts or completes

Additional alarm types may appear depending on your device type and configuration.

Thresholds

  • Battery threshold, set the voltage or percentage level that triggers a low-battery notification
  • Freeze temperature, set the temperature below which a freeze warning fires

Changes are saved automatically when you toggle or adjust a threshold, no Save button needed.

Notification settings on mobile
View full size
Notification settings on mobile

Customer Details

Customer Details manages your account-level information, the name that identifies your account, your billing and contact address, and your notification opt-ins. It is also where you manage your property Locations.

One account is all you need. There is no reason to create separate accounts for different properties or areas. A single account can hold as many named locations as you need.

SettingDescription
Account NameThe name you chose for your account (e.g., "Smith Residence", "Acme Farms"). This is your account identifier, not a physical location.
AddressBilling and contact address. Used as the default billing address for payments, but can be changed for individual transactions.
PhoneContact phone number for the account.
Notification preferencesOpt in or out of SMS and email alerts at the account level.
LocationsNamed labels for property areas where devices are installed. See Locations below.

Navigate to your account details page from Account in the app sidebar to access these settings.


Locations

Locations are short labels for the physical areas where your devices are installed, for example "Front Yard", "Back Pasture", or "Zone A, East Field". They help you organize devices by area within your single account.

Locations are labels only. Devices carry their own GPS coordinates, so no address is needed for a location, just a name up to 32 characters.

You do not need multiple accounts for multiple sites. One account handles any number of locations across any number of areas. If you were previously advised to create separate customer accounts to represent different physical locations, that is no longer the recommended approach, use Locations instead.

Managing Locations

Locations are managed from your account details page → the Locations card.

ActionWho can do it
View locationsAll users
Add a locationAdmin users only
Rename a locationAdmin users only
Delete a locationAdmin users only
  • Location names are limited to 32 characters.
  • When you add your first location, the app pre-fills your account name as a starting point, accept it or type something more specific.
  • Each device can be assigned to a location from its device settings page.
  • If a location is deleted, devices previously assigned to it will need to be reassigned.

Profile & Settings

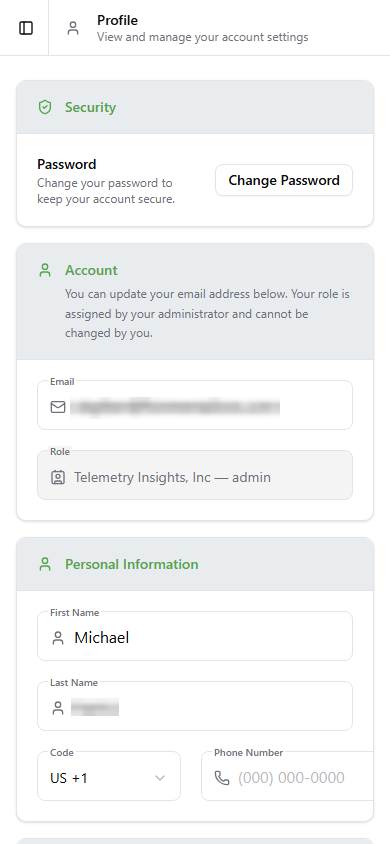
The Profile page manages your personal account details and display preferences.

SettingDescription
First Name / Last NameYour display name
PhoneContact phone number
UTC OffsetYour local timezone, controls how timestamps display throughout the app
UnitsToggle between metric (°C, mm) and imperial (°F, in) for all sensor readings
Email alertsEnable or disable email notifications in addition to push notifications
SMS alertsEnable or disable text message notifications
Profile and settings on mobile
View full size
Profile and settings on mobile

WiFi Requirements

Devices require a 2.4GHz WiFi network. 5GHz networks are not supported. Most modern routers broadcast both bands, make sure you connect to the 2.4GHz network during device provisioning.


Device Reset

If a device becomes unresponsive, you can factory reset it:

  1. Locate the pinhole reset button on the bottom of the device enclosure (next to the USB-C port)
  2. Insert a pin or straightened paperclip and press and hold for 10 seconds
  3. Release when the LED flashes rapidly

After a reset the device returns to provisioning mode and must be re-provisioned and re-linked to your account.


Battery Life

Devices run indefinitely on USB power (the included USB-C power supply). The internal Li-ion battery provides backup power for up to 24 hours during a power outage, keeping the device online, sending data, and firing alerts even without external power.


Shipping

Telemetry Insights currently ships to the United States and Canada. International shipping is planned for 2026. Contact us for current shipping timelines and rates.


Need Help?

Using the Telemetry Insights App | Telemetry Insights